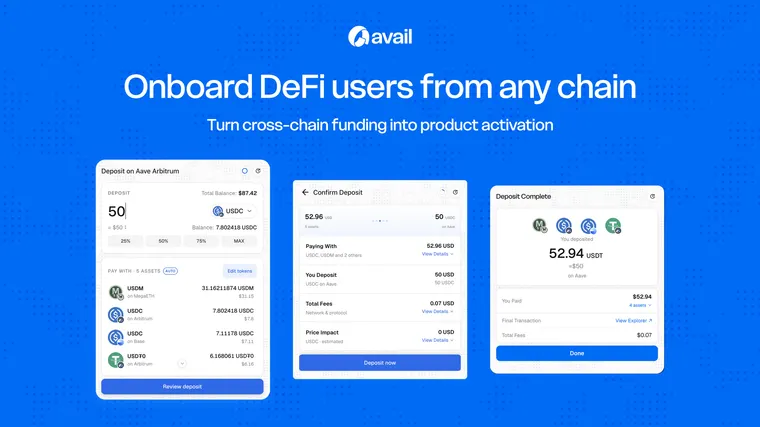




A DeFi application can support a wallet and still fail to onboard the person behind it. The user may connect successfully, then discover that their funds are on the wrong chain, held in the wrong token or unusable because they do not have the required native gas asset.
This is not only a bridging problem. It is an activation problem. The user arrived to trade, lend, borrow, stake, provide liquidity or enter a market. Every separate preparation task between wallet connection and that outcome creates another point at which the journey can stop.
The most effective onboarding flow starts with the application outcome and treats cross-chain funding as part of that journey. The following playbook shows how product, engineering and growth teams can design, integrate and measure that experience.
1. Define the activation event before designing the funding flow
Begin by naming the first action that proves the user received value. For a perpetual exchange, it may be funding a trading account and opening the first position. For a lending market, it may be supplying an asset. For a prediction market, it may be funding and placing the first prediction. For a vault, it may be completing the first deposit.
Wallet connected, deposit opened and cross-chain transfer completed are useful funnel events, but none necessarily means the user started using the product. Choose one primary activation event and design the onboarding sequence backwards from it.
This definition also prevents teams from optimising the wrong metric. A high wallet-connect rate can coexist with poor activation when most connected wallets cannot immediately use the application.
2. Detect what the user can use
Do not begin by forcing the user to select a source network. First determine which supported balances can fund the required destination. A user may have enough total value across their portfolio even when no single balance is sufficient.
- Surface eligible balances across supported chains and assets after wallet connection.
- Separate eligible funds from visible but unsupported assets so the user understands what can be used now.
- Show the total eligible value when multi-source funding is available, not only isolated per-chain balances.
- Explain why a balance cannot be used, such as an unsupported asset, insufficient amount or temporarily unavailable route.
- Avoid a chain-first empty state that incorrectly suggests the user has no funds simply because the currently selected network is unfunded.
Avail’s chain-abstraction model presents supported assets as a unified balance across wallet-linked chains. For a deposit experience, this lets the app begin with ‘Which of your balances can fund this outcome?’ instead of ‘Which bridge and source chain do you want to use?’
Sources: Chain abstraction overview · Deposit Widget
3. Present the destination before the route
Users should understand the result before they inspect the infrastructure used to produce it. State what asset will arrive, on which chain, in what amount and what the user will be able to do next.
A destination-first interface might say ‘Fund 100 USDC to open your position’ and then show the eligible balances that can pay for it. A route-first interface makes the user reconstruct that outcome from source chain, destination chain, token and bridge fields.
- Keep the destination application, chain and asset fixed when the product outcome requires them.
- Show the expected received amount and fees before confirmation.
- Make source balances selectable, but do not expose unnecessary routing decisions as required user choices.
- Keep route, provider, slippage and transaction details available for users who want to inspect them.
- Use plain product language such as ‘Fund account’ or ‘Supply USDC’ instead of making ‘Bridge’ the primary call to action.
Exact-output funding is especially useful when the destination requires a known amount. Instead of asking the user how much of one source asset to spend, the application specifies the desired output and calculates the eligible funding required.
Sources: Exact-output swaps · Avail Deposits product page
4. Coordinate swaps and gas inside the funding journey
Wrong-token and gas friction are often disguised as user education problems. The interface tells the user to acquire a specific stablecoin, switch networks, bridge funds and obtain the destination chain’s native token. Each instruction shifts product complexity onto the user.
For supported routes, treat these operations as execution details. The funding layer should calculate required conversions, coordinate cross-chain movement and account for gas so the user can confirm the outcome rather than assemble it manually.
This simplification should not hide economic information. Before confirmation, show the source amount or selected balances, destination amount, provider or protocol fees, estimated gas, price impact or slippage where applicable, and the minimum the destination can receive.
Sources: Avail Nexus intents · Cross-chain deposit infrastructure
5. Continue into the intended product action
A successful funding confirmation should not return the user to a generic home screen. Preserve the market, asset, vault, trade or position that brought the user into the flow. Refresh the relevant balance and make the next action obvious.
- Return the user to the exact market or product state they started from.
- Refresh balances and position state automatically after completion.
- Pre-fill the relevant amount or asset again when it is safe and useful.
- Show one clear next action, such as ‘Open position’, ‘Supply now’ or ‘Place prediction’.
- Store enough client-side state to recover the journey after a reload or wallet reconnection.
Avail Widgets expose lifecycle callbacks including start, completion and error states. Teams can use these events to update the application, refresh balances, record analytics and return the user to the relevant action without forking the component.
Sources: Widget installation · Widget callback guidance
6. Design recovery before the happy path ships
Cross-chain execution can fail before signing, during source execution or after a route has started. A generic ‘transaction failed’ message leaves the user unsure whether funds moved, whether it is safe to retry and what action to take next.
Create explicit interface states for wallet rejection, approval failure, insufficient eligible balance, quote expiry, route unavailability, destination price movement, delayed completion and an expired or unfulfilled intent. Each state should answer three questions: What happened? Where are the funds? What can the user do now?
- Do not encourage a blind retry when a transaction may already be pending.
- Retain the intended destination and amount when refreshing an expired quote.
- Link to an explorer or transaction history when a verifiable onchain step exists.
- Distinguish a recoverable delay from a terminal failure.
- Give support teams the intent or transaction identifier needed to investigate.
Avail documents the intent lifecycle from creation and source deposits through fulfilment or expiry. Product copy should reflect the state the system can verify rather than collapsing every non-completion into the same error.
Sources: Intent lifecycle
7. Measure activation, not only transfer completion
Instrument the journey as one funnel that begins before funding and ends at the intended DeFi action. This lets teams separate balance eligibility problems, quote or wallet friction, execution failures and product-level drop-off.
Track conversion between each stage, time to activation and the reason for every observable exit. Segment results by source chain, source asset, destination, deposit-size band, new versus returning user and single-source versus multi-source funding. A completed transfer without subsequent product use is infrastructure success but incomplete onboarding success.
Avoid claiming that a new flow improves conversion until the experiment measures the same activation event for comparable users. Route completion, transaction count and speed can explain the result, but the product action is the outcome that matters.
8. Choose the right integration surface
Use the Deposit Widget when the team wants a configurable, app-native interface that already handles eligible-balance selection, destination review, progress and completion states. Use the Avail SDK when the application needs to own the entire interface, embed funding into a specialised account model or coordinate custom behaviour around the destination action.
- Choose the Widget for a faster implementation and a maintained interaction layer.
- Choose the SDK when custom product state, analytics, accessibility or interface control requires deeper ownership.
- In both cases, configure the destination around the app outcome rather than presenting a general bridge.
- Validate supported chains, assets, amounts, exact-input or exact-output behaviour, gas handling and recovery using live representative routes before launch.
Sources: Deposit integration docs · Widgets reference